
 My Lists
 Classes
 Learning Center
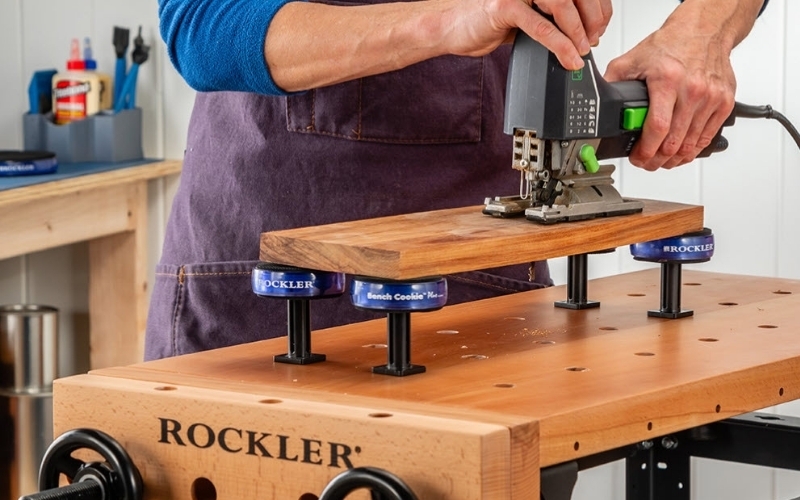
If you're exploring how to start woodworking, it’s easy to feel overwhelmed by the array of machinery and tools available. However, you don't need a shop full of stationary equipment to get started. At Rockler, we believe the most rewarding and practical approach to woodworking for beginners is through project-based tool acquisition: identify the first two or three projects you want to build, then invest only in the tools those specific projects require
Browse Rockler's power tool selection to compare options for your first shop.
What tools should a beginner woodworker buy first?
When it comes to selecting your first beginner woodworking tools, start with this woodworking tool starter kit and what professional woodworkers call the Core Four — four versatile, forgiving tools that cover nearly every cut, hole, and surface a beginner project demands:
1. Cordless Drill/Driver The single most-used tool in any shop. A drill drives screws, bores holes for hardware, and with the right bits can mortise, counterbore, and countersink. Look for a brushless motor, at least 18V, and a 2-speed gearbox. Buy two batteries — you'll always want one charging. Browse Rockler's drilling tools.
2. Circular Saw A circular saw paired with a quality straightedge guide (or a track saw and track) does everything a table saw does for ripping and crosscutting — just more slowly and with slightly more setup. That's a worthwhile trade for a beginner. A 7¼" blade handles standard dimensional lumber and sheet goods. A carbide-tipped 40-tooth blade covers most cuts cleanly. Explore Rockler's circular saws and track saws.
3. Random Orbital Sander Finish quality separates a project that looks handmade from one that looks hand-crafted. A random orbital sander removes mill marks, levels glue joints, and preps surfaces for finish faster than any hand sanding method. Start with 5" pads and a dust-collection bag. Shop Rockler's orbital sanding tools.
4. Jigsaw The circular saw handles straight cuts. The jigsaw handles everything else — curves, cutouts, notches, and arcs. It's essential for any project with shaped parts and surprisingly capable of ripping lumber in a pinch. A variable-speed orbital jigsaw with tool-free blade changes is the standard to look for. Shop Rockler's jigsaw tools.
Together, these four beginner woodworking tools give you a fully functional starting point. Add tools one at a time as specific projects demand them, and you'll never buy something you don't actually need. Browse all Rockler power tools to compare brands and configurations.
Why do so many woodworkers say you can never have enough clamps?
Because it's true — and every beginner learns this lesson the hard way.
Clamps are among the most essential beginner woodshop tools, yet they're almost always underestimated at the start. They serve two entirely different functions in a woodworking shop. During assembly and glue-ups, clamps apply even clamping pressure across joints while glue cures — typically 30 to 60 minutes for PVA wood glue at room temperature. A panel glue-up for a tabletop or cabinet side can require 8 to 16 clamps or more depending on width. Run short on clamps and you get gaps, starved joints, and "crooked project syndrome" — the assembly looked perfect dry but twisted or bowed under uneven glue-up pressure.
During machining operations, clamps hold workpieces flat and secure to a bench or stop block while you cut, rout, or drill. A workpiece that shifts mid-cut produces a ruined part at best, a dangerous kickback situation at worst.
The clamps every beginner needs:
Bar or pipe clamps (24"–48") — for edge-gluing panels and clamping wide assemblies. You want at least six to start; serious woodworkers own dozens. Shop Rockler's bar clamp selection.
F-clamps / C-clamps — for holding workpieces to a bench during routing or drilling. A set of four 6" and four 12" F-clamps covers most situations. Shop Rockler's f-clamp selection.
Quick-release one-hand clamps — indispensable when you need to reposition a workpiece mid-operation without setting down your tool. Buy a set of six in mixed sizes. Shop Rockler's quick action clamp selection.
Strap or band clamps — for odd-shaped assemblies like frames, cabinets, and chairs where parallel jaw clamps can't reach. Shop Rockler's band clamp selection.
A practical starter set: 6 bar clamps, 6 F-clamps, 6 one-hand clamps, and 1 band clamp. Clamps work alongside every other tool in your beginner woodshop — the drill, the saw, the sander — and you'll reach for them constantly. Double that starter count before you attempt your first cabinet build.
How do I set up a small garage or basement woodworking shop?
A one-car garage or a 200-square-foot basement can be a fully functional woodworking shop. The key is treating space as a system, not just square footage — and making sure your beginner woodworking shop setup is organized and accessible in a way that works with the space you have, not against it.
Workbench first, always. A flat, stable workbench is the single most important investment in any shop. It's a cutting surface, an assembly table, a clamping station, and a finishing table all in one. Before you buy a second tool, buy — or build — a proper bench. Rockler offers a range of workbenches and work stations sized for small shops, including fold-flat and wall-mounted options for tight spaces.
Put tools on wheels. A table saw, band saw, or planer that sits permanently in the middle of the shop owns that floor space forever. Put everything on mobile bases and you can roll tools into the center for use and push them against the wall when you're done. This one habit can effectively double the functional workspace in a small shop — and it makes it much easier to keep your tools for a beginner woodworker within reach without sacrificing valuable floor space.
Go vertical for lumber and material storage. Horizontal lumber racks eat floor space. Wall-mounted vertical racks keep boards organized, accessible, and off the floor. Sheet goods (plywood, MDF) store best standing on edge in a vertical slot rack — an afternoon build that pays dividends every time you go to grab a panel.
Manage dust at the source. Fine wood dust is a respiratory hazard and a fire risk — not a cleanup problem to solve after the fact. A shop vacuum connected directly to each tool at the point of cut is far more effective than an ambient air filtration unit trying to clean the air after dust has already spread. For serious dust control, a dedicated dust collector paired with a ceiling-mounted air filtration unit covers both bases. At minimum, connect your sander and circular saw to a shop vac on every cut.
Lighting matters more than most beginners expect. Shadows cause measurement errors and make it harder to read grain direction when hand planing or routing. Install at least 50 foot-candles of overhead fluorescent or LED lighting, and add a portable work light for detailed operations. Rockler has a selection of shop lighting to help get you started.
How dangerous is woodworking for beginners, and how do I stay safe?
Woodworking carries real risk and workshop safety is critical — but it's manageable risk, and the vast majority of injuries are preventable with the knowledge and the right woodworking safety gear.
Amateur woodworkers account for 60.5% of all woodworking injuries, largely because they're learning tool technique at the same time they're operating machinery capable of causing serious harm. The most common injuries are lacerations and amputations from table saws, jointers, and band saws — precisely the machines that beginners are most likely to misuse due to unfamiliarity. That's one more reason why choosing the right tools for beginners woodworking — a cordless drill, circular saw, jigsaw, and random orbital sander — is a safer path than jumping straight to stationary machinery. Handheld power tools give you more control over the workpiece and a lower margin for serious error while you're still building your skills.
The Core PPE you need before your first cut:
Eye protection — safety glasses or a face shield on every cut, every time. Wood chips and sawdust travel faster than you think. Browse Rockler's eye protection gear.
Ear and hearing protection — earmuffs or earplugs whenever power tools are running. Circular saws and routers routinely exceed 100dB — enough to cause permanent hearing damage in under 15 minutes of unprotected exposure. Shop Rockler's hearing protection options.
Respiratory protection — an N95 particulate respirator at minimum for sanding; a full respirator for applying solvent-based finishes. Fine wood dust (especially from MDF, walnut, and cedar) is a known carcinogen with long-term health consequences. Browse Rockler's dust masks and respirators.
Cut-resistant gloves — for handling rough lumber and sharp hand tools like chisels and card scrapers. Never wear gloves near rotating machinery — they can catch and pull a hand into a blade.
Behavioral habits that prevent injuries:
Never reach over or behind a spinning blade
Always use a push stick when ripping narrow stock on a table saw
Disconnect power before changing blades or bits
Let spinning parts come to a complete stop before repositioning work
Keep your shop floor clear — trips near power tools are serious accidents waiting to happen
What are the most common beginner woodworking mistakes — and how do I avoid them?
Every beginner makes a few of these — and choosing the right wood tools for beginners early on helps you avoid the most costly ones.
1. Buying warped lumber without inspecting it first. Every board at the lumber yard or home center needs to be sighted down its length before it goes in your cart. Hold one end up to eye level and look down the face and edge. Bow, cup, twist, and crook are all defects that compound downstream — a warped board produces a warped cut, which produces a warped joint, which produces a warped project. Put it back.
2. Ignoring wood movement. Wood is hygroscopic — it absorbs and releases moisture from the surrounding air, expanding across the grain in humid conditions and contracting in dry ones. A 12"-wide panel can move ¼" or more seasonally. If you glue or fasten it in a way that prevents that movement (like running screws through a solid wood panel into a rigid frame), the wood will eventually split or break the joint. Always leave room for movement in wide solid wood panels and tabletops.
3. Skipping sandpaper grits. Sandpaper grits are a sequence, not a menu — you can't skip from 80-grit to 220-grit and expect a smooth finish. The deep scratches left by coarse grits must be removed by the next finer grit before moving on. The standard progression for most projects: 80 → 120 → 180 → 220. Each grit removes the scratches from the one before it. Skip a step and those scratches show up through your finish coat, especially under stain. Shop Rockler's sanding supplies.
4. Rushing finish coats. The manufacturer's recoat window printed on the can is not a suggestion. Applying a second coat of finish before the first has fully cured traps solvents between layers, creating a finish that stays soft, clouds over time, or peels. Set a timer. Read the data sheet. Wait. Browse Rockler's finishing supplies for a full range of stains, topcoats, and application tools.
5. Measuring once. The woodworking maxim "measure twice, cut once" exists because a miscut board costs you time, money, and often the last usable piece of a given size. Develop the habit of marking your cut line with a marking knife (not a pencil — knife lines are more precise), double-checking the measurement against your cut list, and making a light scoring pass before committing to the full cut. Shop Rockler's marking and measuring tools.
6. Not learning to sharpen. A dull chisel requires more force, is harder to control, and produces a rougher cut than a sharp one. Sharpening is not an advanced skill — a basic honing guide and a set of waterstones will put a working edge on any chisel or plane iron in under 10 minutes once you've practiced the motion a few times. Look here for Rockler's tool sharpening options.
7. Buying tools without a plan. One of the most common mistakes beginners make is purchasing equipment before they know what they'll build. A well-chosen starter kit — built around your first few projects — keeps costs down, prevents clutter, and ensures every tool earns its place in your shop. Start with the essentials, then add as specific projects demand it.
What first woodworking projects are best for beginners?
The best first project is one that teaches real skills, uses your new tools in realistic ways, and produces something you actually want to keep. Before you pick up a single board, though, it helps to have a solid woodworking tools starter kit in place — a cordless drill, circular saw, jigsaw, and random orbital sander will cover everything these projects demand. Strong candidates to start with:
A cutting board — prioritizes gluing, clamping , and sanding.
A simple step stool or small shelf — practices crosscutting, drilling, and driving fasteners
A birdhouse or small box — introduces measuring, squaring an assembly, and glue-ups
A basic workbench — teaches you every fundamental skill at once and gives you the most useful thing in your shop
A picture frame — practices miter cuts and teaches the importance of precision measuring
Each of these projects is achievable with beginner-level tools and technique — and each one builds the confidence and muscle memory that makes the next project easier. Rockler's Learning Center has project plans, how-to videos, and step-by-step guides built specifically for beginners, many with downloadable cut lists and tool requirements so you know exactly what you need before you start. You can also browse Rockler’s Small Project Kits selection to help you get started.
How much does it really cost to set up a beginner woodworking shop?
Project-based tool acquisition keeps startup costs much lower than most beginners expect — and it means every dollar you spend is tied directly to something you're actually building. Whether you're tackling beginner woodworking projects like a simple shelf, a small cabinet, or a workbench, you'll find that a focused starter kit gets you there without overextending your budget. Here's a realistic breakdown:
Core Four power tools (drill, circular saw, sander, jigsaw): $300–$600 depending on brand
Starter clamp set (6 bar, 6 F-clamps, 6 one-hand): $150–$250
Basic PPE (glasses, ear protection, respirator): $50–$100
Workbench (built or bought): $200–$600
Miscellaneous (blades, sandpaper, drill bits, wood glue): $75–$150
Total realistic starter budget: $775–$1,700 — compared to $800–$3,000 for a table saw alone, before the fence, stand, or outfeed support.
The beauty of this approach is that your tool collection grows naturally alongside your skills. As your beginner woodworking projects become more ambitious, you add tools one at a time — only when a specific project calls for them. Browse Rockler's full power tool catalog and hand tools to compare options at every budget level.
Key Takeaways for Beginning Woodworkers
Adopt a Project-First Mindset: Identify 2–3 specific projects you want to build and invest only in the tools required for those specific tasks.
Start with the "Core Four": A cordless drill, circular saw, random orbital sander, and jigsaw form a versatile woodworking tools starter kit capable of handling most beginner projects without needing large stationary machinery.
Prioritize Clamps: You will need more clamps than you expect for both assembly and securing workpieces during machining to ensure safety and precision.
Optimize Your Shop Layout: Use mobile bases for tools and vertical storage for lumber to maximize efficiency in a small garage or basement workspace.
Commit to Safety: Always use essential PPE (eye, ear, and respiratory protection) and develop safe behavioral habits, such as using push sticks and keeping a clear workspace.
Avoid Costly Mistakes: Inspect lumber for defects before buying, account for seasonal wood movement, and never skip sandpaper grits if you want a professional-quality finish.
Last updated: July 14th, 2026


